What is Prototyping?
Prototyping means creating a model or illustration of a proposed solution for the purpose of testing with the intended users or beneficiaries of that solution.
Creating prototypes helps you test ideas and evaluate how your ideas are changing over time. By sharing your prototypes with school community members, you can gather feedback to help refine your solutions before investing a lot of time and resources.
This module will help you build a prototype of your proposed solution. Review the Testing module to figure out the best way to test your prototype in your community.
Methods
The methods in this module are organized in sequential order, to help you get from a lot of loose ideas to be prioritized, all the way to building prototypes of concepts based on some of those ideas. Each method includes a worksheet with instructions to help you complete it.
- Prioritization Matrix: Rank ideas based on criteria defined by the community.
- Concept Poster: Combine complimentary ideas to start creating a proposed solution.
- Building your Prototype: Create tangible representations, such as visuals or mock-ups, for the purpose of testing.
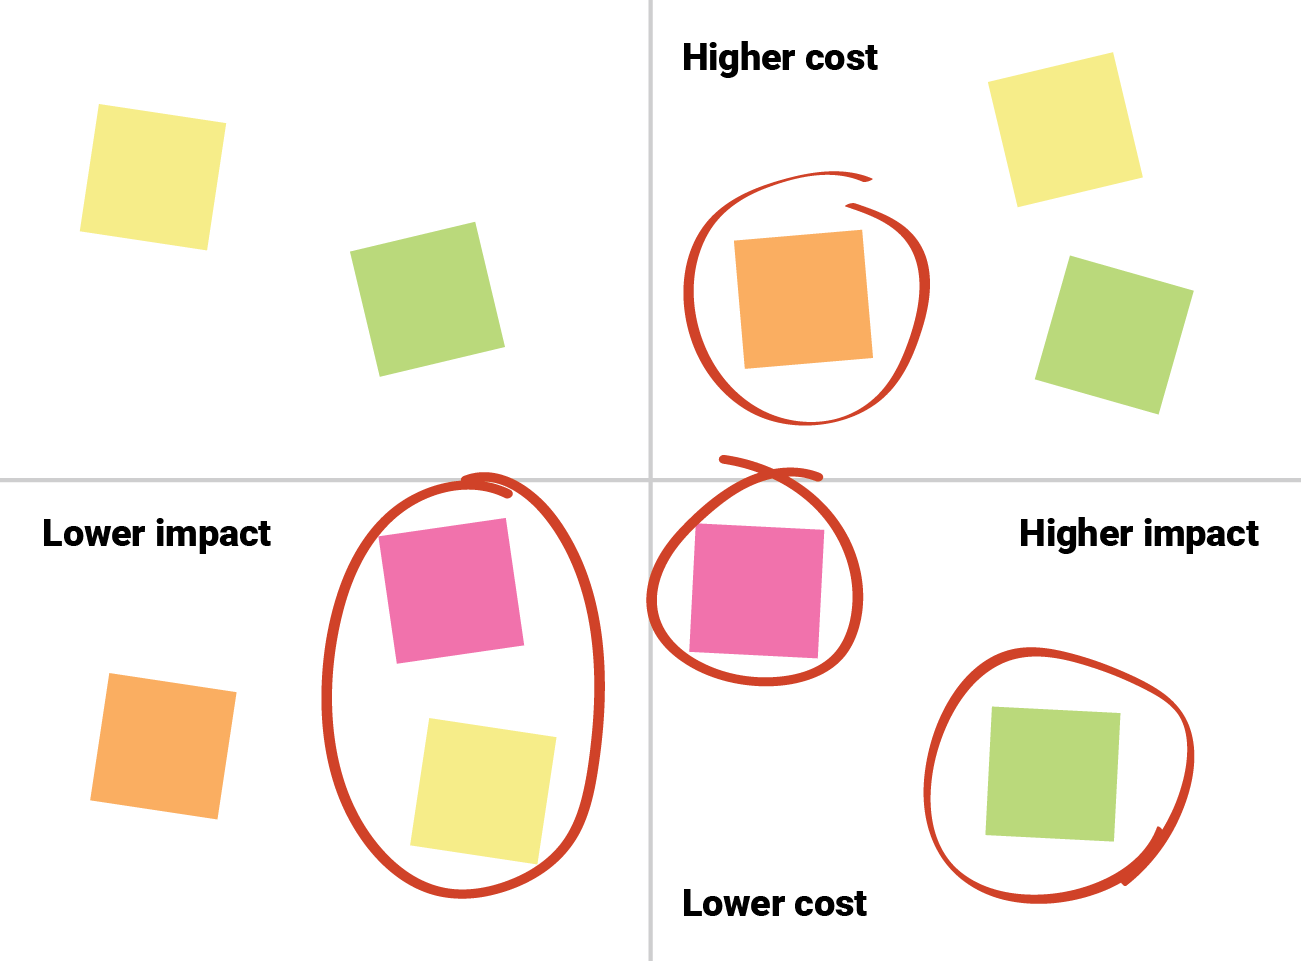
Prioritization Matrix
Evaluate, prioritize, and combine ideas from Ideating
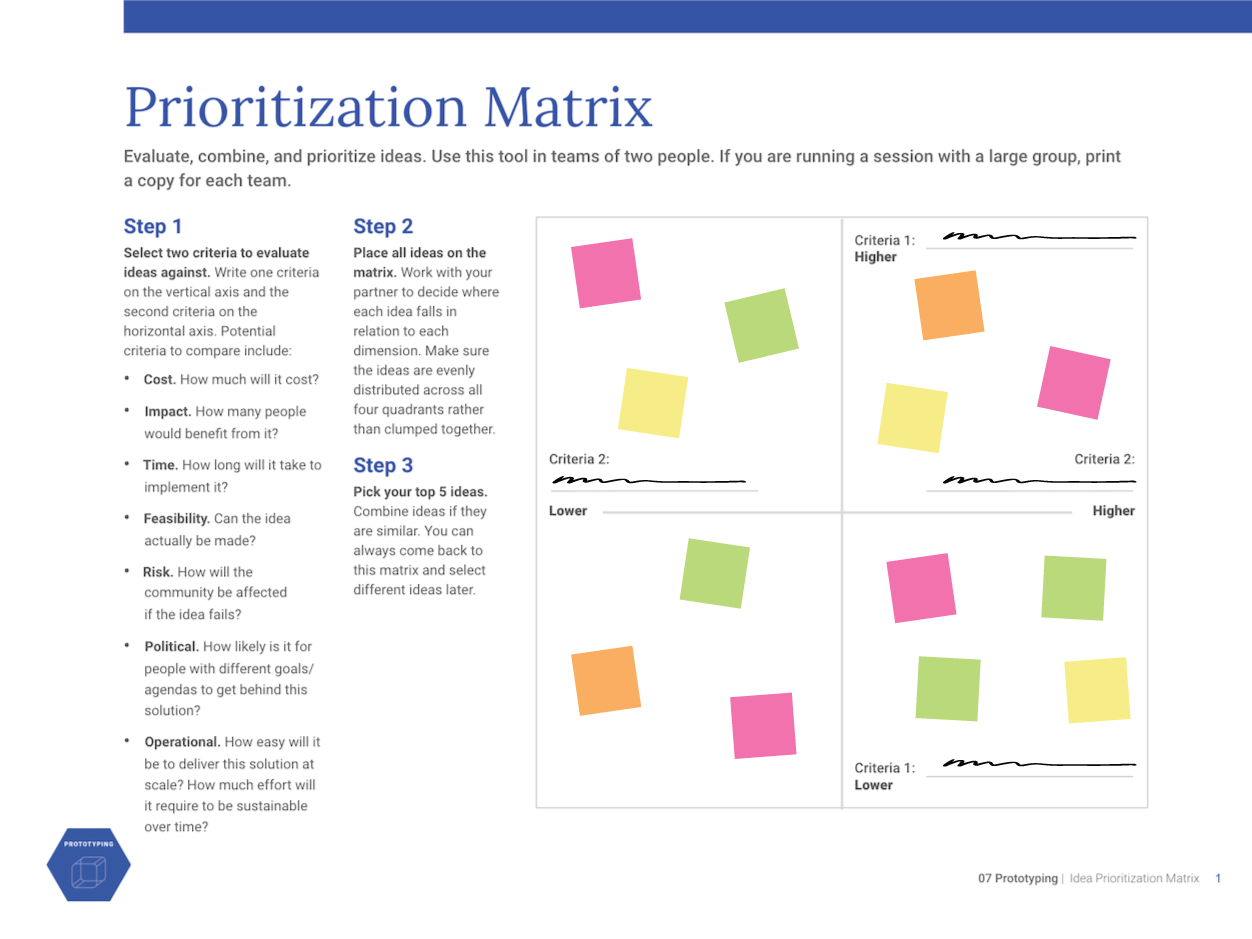
Overview
During Ideating it was important to generate as many ideas as possible and not judge if they were “good” or “bad”. However, you now need to prioritize those ideas and pick which ones to develop first.. One way to do this is by using the Prioritization Matrix poster to rank ideas based on criteria defined by the community members working with you. This exercise may take between 30 and 45 minutes to complete with a set of 10 to 20 ideas to be prioritized.
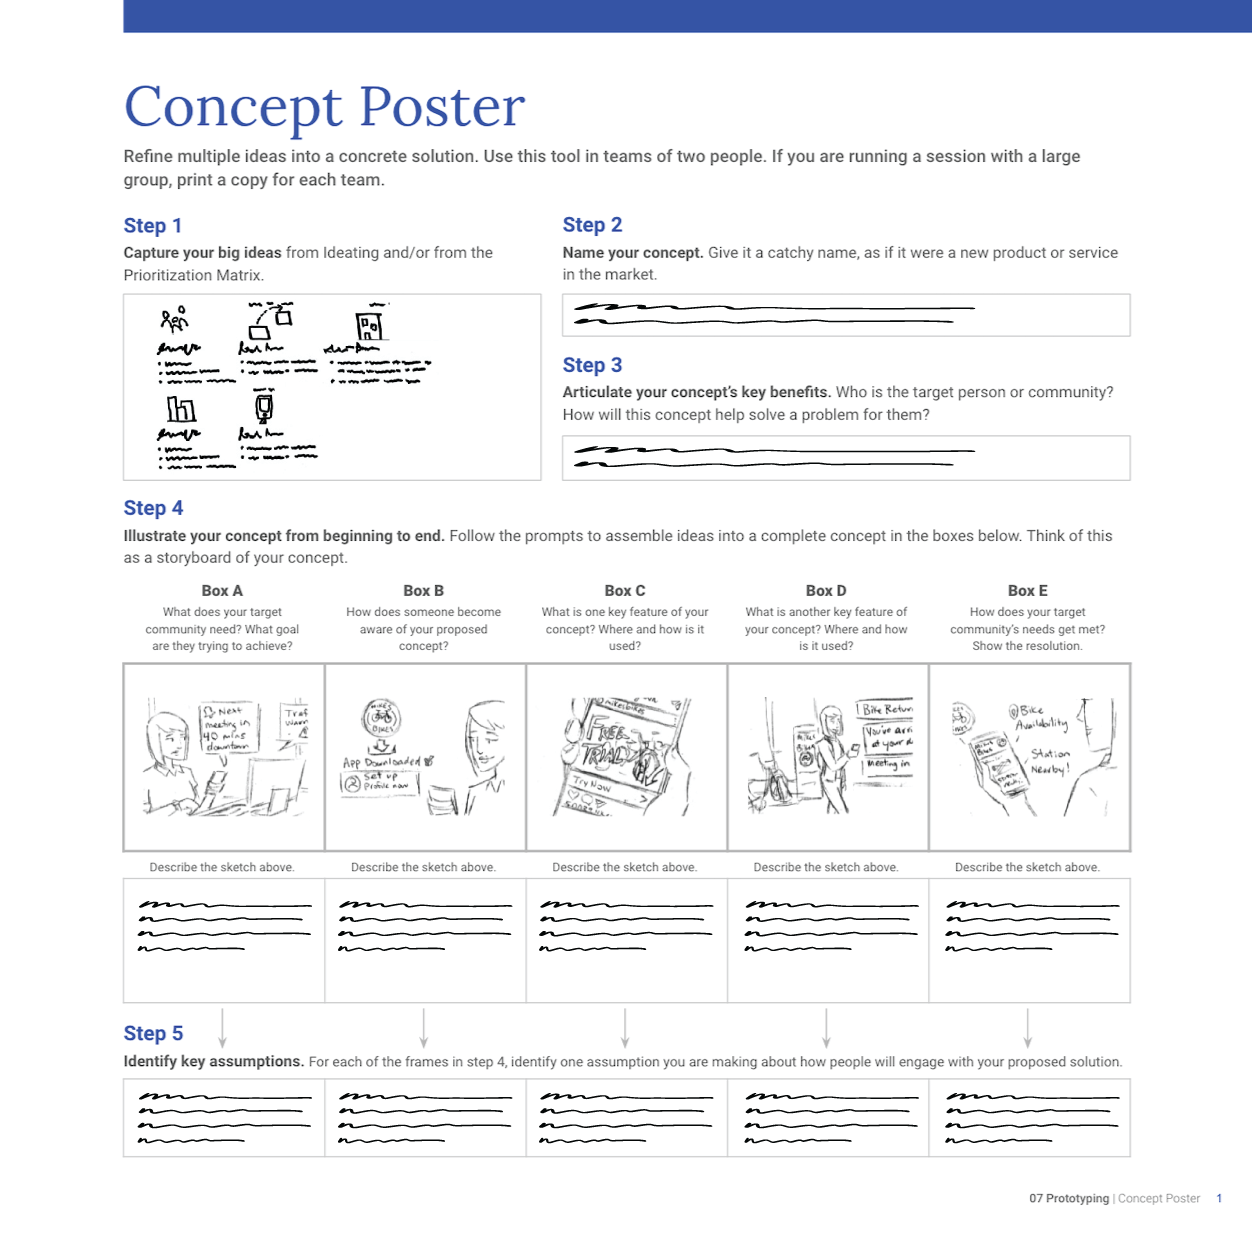
Concept Poster
Refine ideas into integrated concepts

Overview
Once you have used the Prioritization Matrix to combine and prioritize ideas, the Concept Poster will help you refine these ideas into more concrete solutions, or what we call a concept. The difference between an idea and a concept is that a concept combines multiple ideas together to form a more robust and cohesive solution to a problem. By refining your ideas into a concept you are able to consider the entire solution from beginning to end, and identify specific features that you can prototype and test.
Your Concept Poster serves as your first prototype — an emerging design, rather than a vague idea. It helps showcase your thinking and make your assumptions tangible. Like all prototypes, the first concept you develop on your poster will evolve over time as you test and iterate, so don’t worry about getting your concept right on the first try. In fact, you should expect to revisit and change parts of your concept, if not the entire concept, many times.
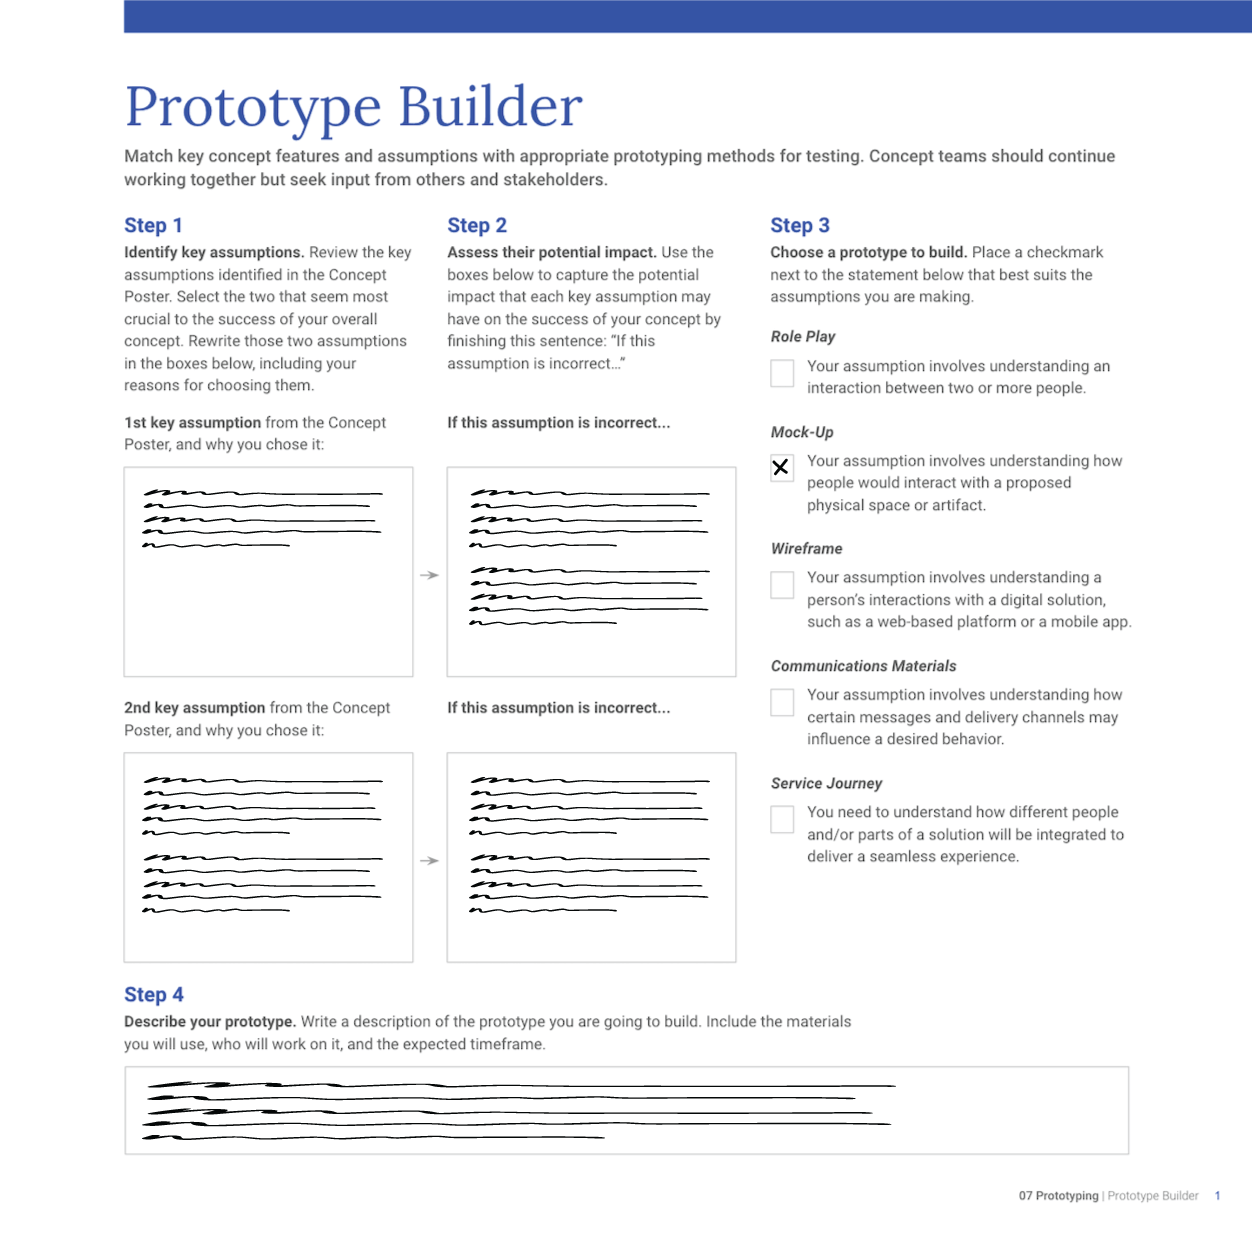
Building your Prototype
Create tangible representations of the solution for the purpose of testing and learning
 |
> |
 |
DOWNLOAD CONCEPT POSTER WORKSHEET
DOWNLOAD PROTOTYPE BUILDER WORKSHEET
Overview
A Concept Poster is an initial illustration of your concept. But your proposed solution will likely require much more than a handful of illustrations and descriptions to start coming to life. Building your Prototype will help you turn the storyboard in your Concept Poster into tangible and useful representations of your proposed solution.
When prototyping for the first time, it can be challenging to know where to start. Once you have a few iterations of prototypes, have tested them, and incorporated feedback under your belt, the process will become more intuitive. To get you started, the Prototype Builder worksheet will help you match key assumptions identified on your Concept Poster with methods to build and test prototypes.
Once you test this first version, you can build refined and final versions of your prototype, which are also described below:
Role Play
During a role play, you and/or your team act out a proposed service or experience in front of community members to get their feedback. Role plays may involve the delivery of a pre-written script.
-

First role play
You or your team should write the script and create rough sketches of some materials used for a proposed interaction between people. Test these individually with 4 to 6 community members that represent those who the solution is intended to serve and note your observations about what went well and what didn’t.
-
Refined role play
Once you’ve tested your first role play with a few people, use your observations to refine the script and materials. Consider adding other elements, such as how you lay out the physical space, the type of furniture you want to use, etc. Feel free to use inexpensive materials, like cardboard, to simulate these elements.
-

Final role play
Design the script and materials in detail for one portion of the whole interaction you are envisioning. Use the space, props and furniture as you intend it to be used in real life and test again.


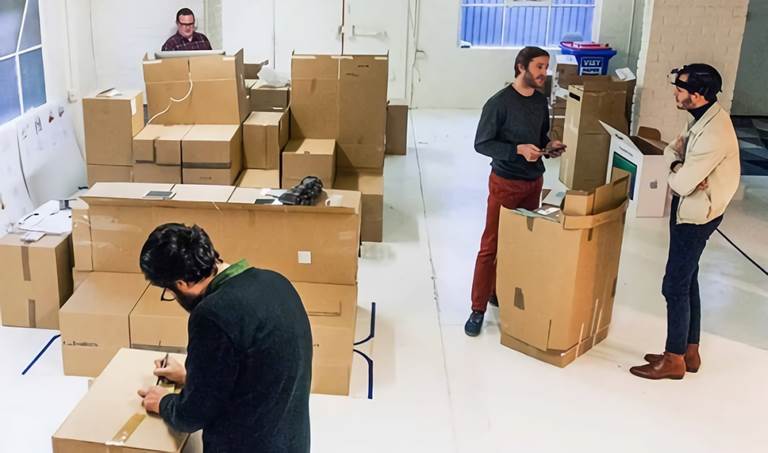
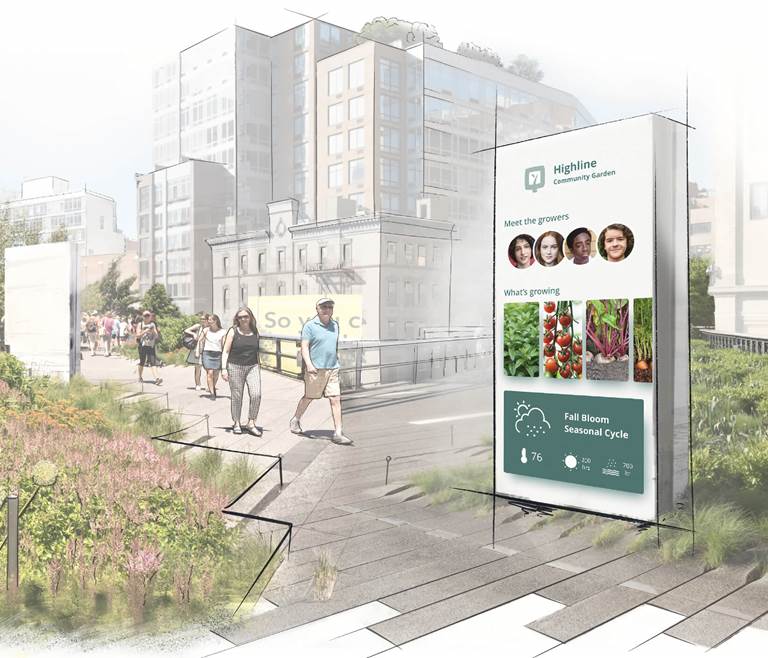
Mock-ups
Create mock-ups to simulate an experience with a proposed space or a physical artifact.
-
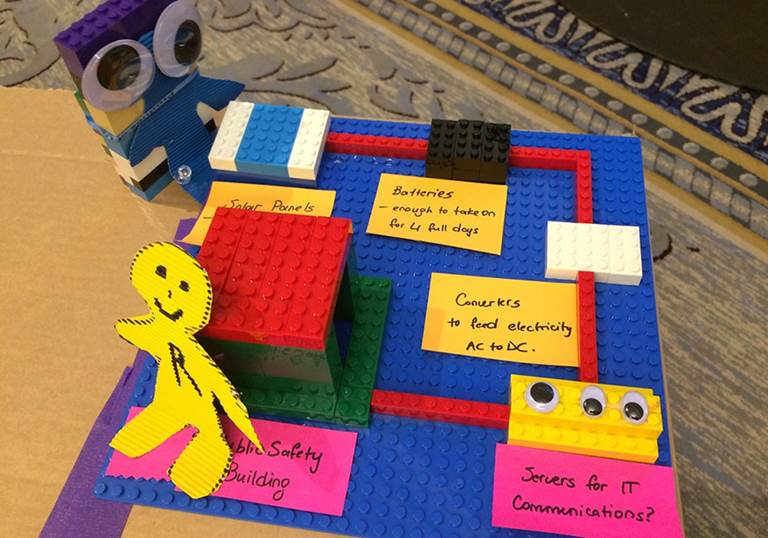
First mock-up
Create a small-scale version of the proposed solution, using materials that are readily available and easy to use, such as Lego bricks, paper, glue, pipe cleaners, etc. This first version should help you describe the solution and think through its general layout. Share it individually with 4 to 6 community members to get feedback about the overall concept, convey what’s important and present key features you want to highlight.
-
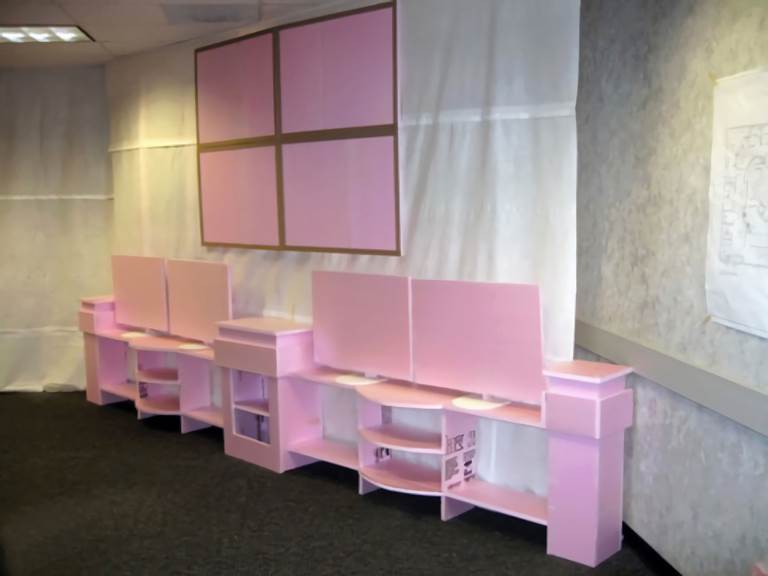
Refined mock-up
Create a real scale version of the proposed solution (it may be in full or just an important part of it), using cheap and accessible materials that will hold together, such as reinforced cardboard, foam boards or PVC pipes. Incorporate elements that resemble the proposed solution, such as specific shapes or signage. Test this individually with 4 to 6 members of the community to get feedback on the emerging details of the solution depicted by your prototype.
-
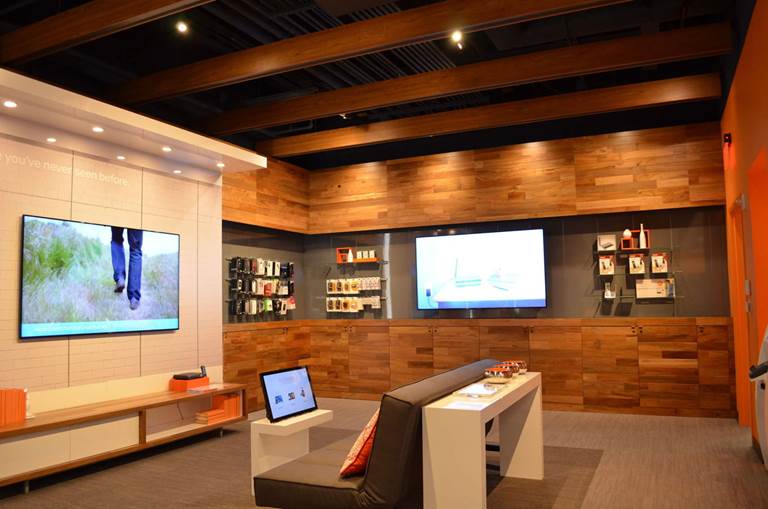
Final mock-up
Deliver a real scale version of the proposed solution (it may be in full or just an important part of it), using materials that represent the appropriate weight and elements of the materials that you intend to use in your final solution. For example, you can paint some of the pieces in their intended color or give some surfaces a finished look. Test it again to get final feedback on the look and feel, and overall usability of what you are proposing.


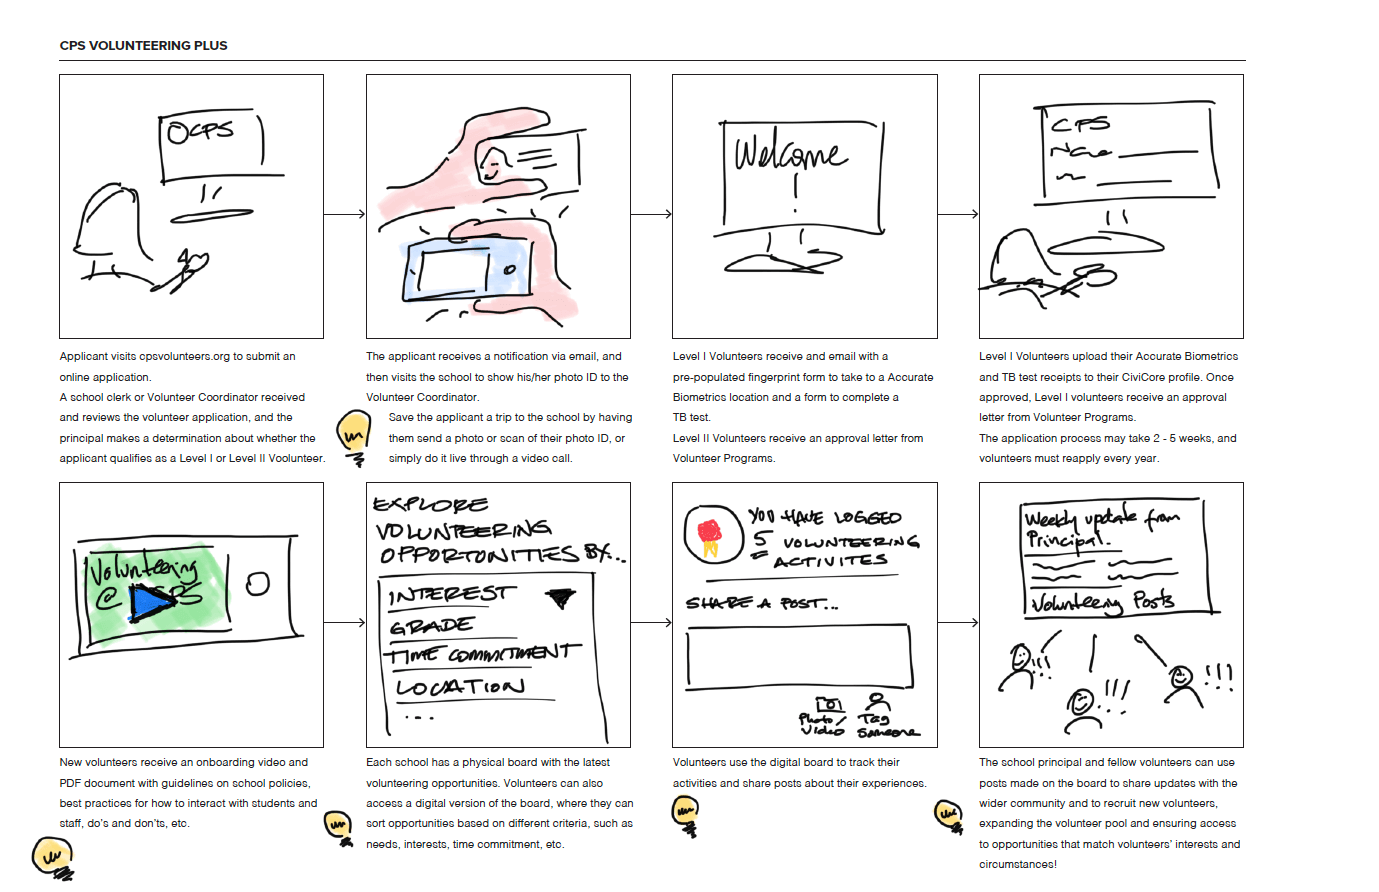
Wireframes
Wireframes help you design the detailed experience — including all the text, buttons, navigation, actions, images, etc. — that someone will have with a proposed digital solution, such as a webpage or website, software, web-based platform, or mobile app.
-
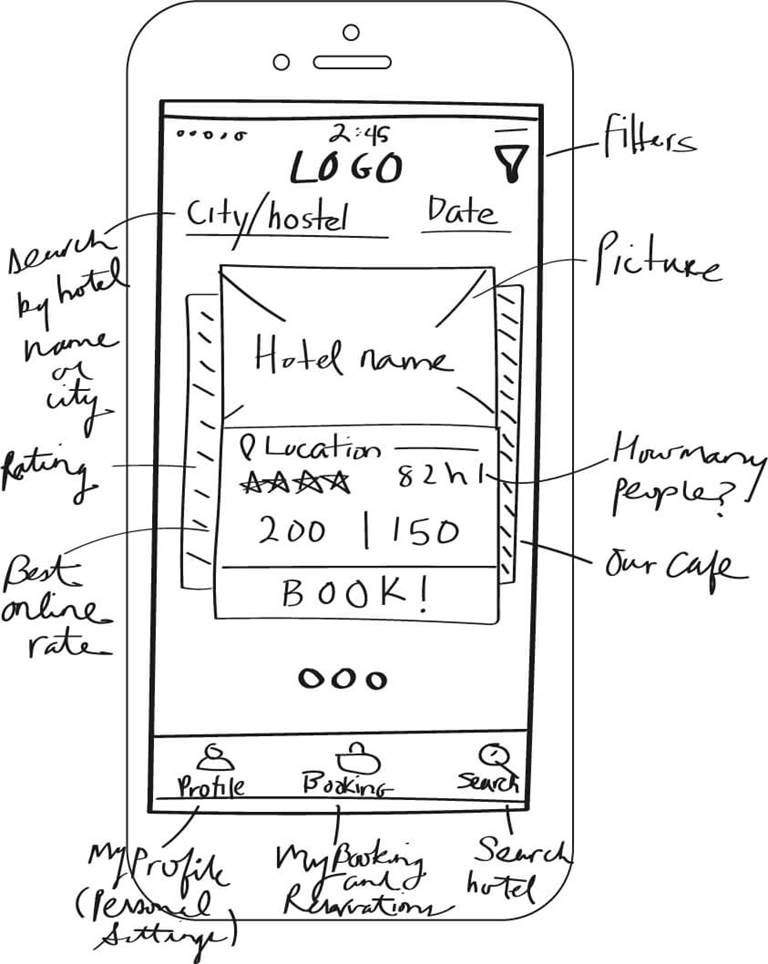
First set of wireframes
Select one crucial task or goal (e.g. “create a user profile” or “sign up for a volunteer activity”) that someone should be able to accomplish using your proposed digital solution, and create rough sketches on paper of all the screens that the person would have to use to complete that task. Note: you don’t need to create all the screens that would make up the entire solution, only those necessary to help the person complete the one particular task or goal that you want to test (e.g. “create an account”).
-
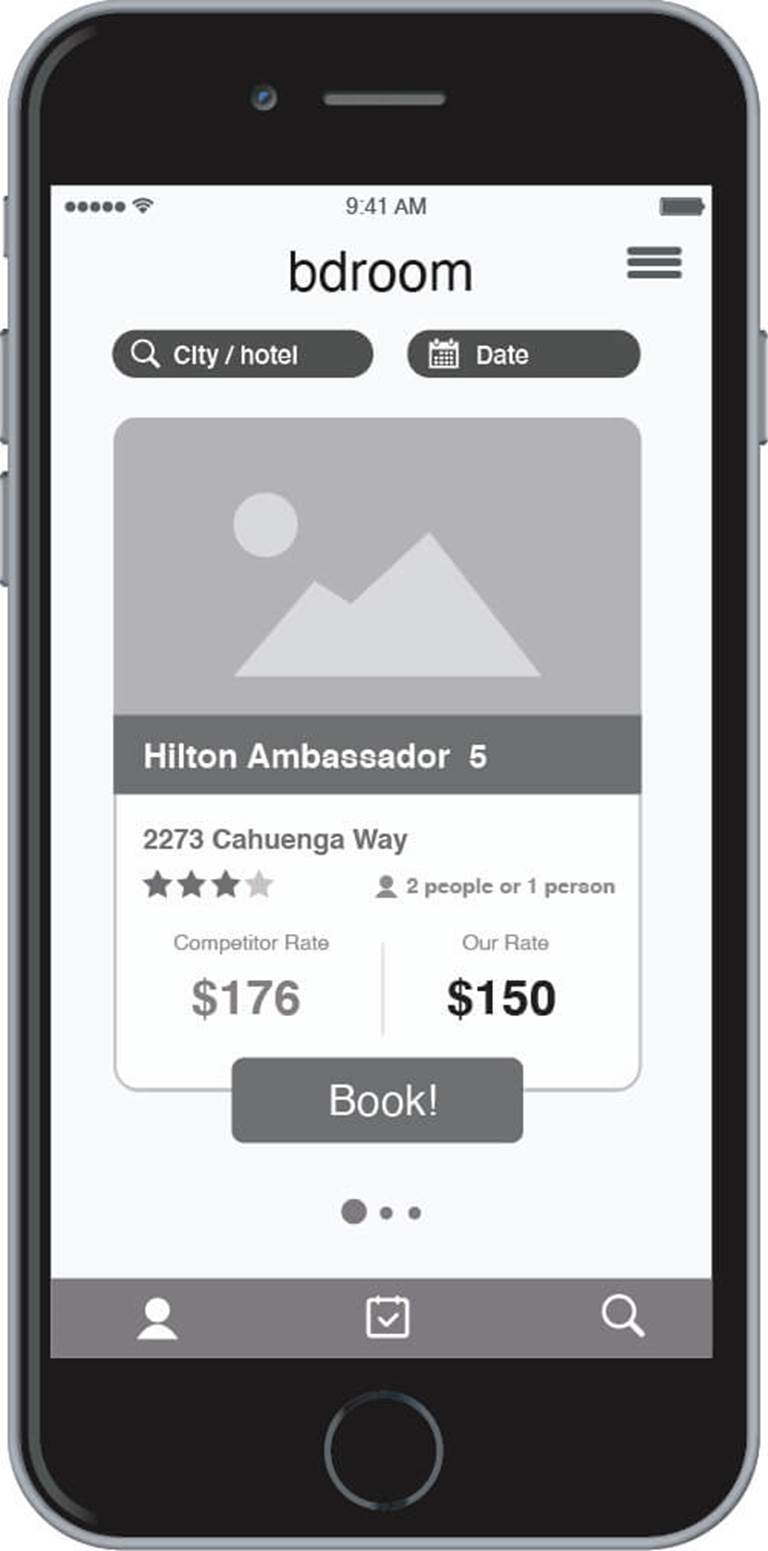
Refined set of wireframes
After testing the first set of wireframes individually with 4 to 6 people, create a digital version that incorporates the things you learned. This first digital version doesn’t need to include all the final colors and images, but it will be more refined than the original hand-drawn version. This version doesn’t need to be clickable, you can just print out the screens and test them again on paper. At this point it is recommended to engage the help of a professional graphic or user experience designer to refine your wireframes. You can also use free wireframing tools, such as Form by InVision.
-
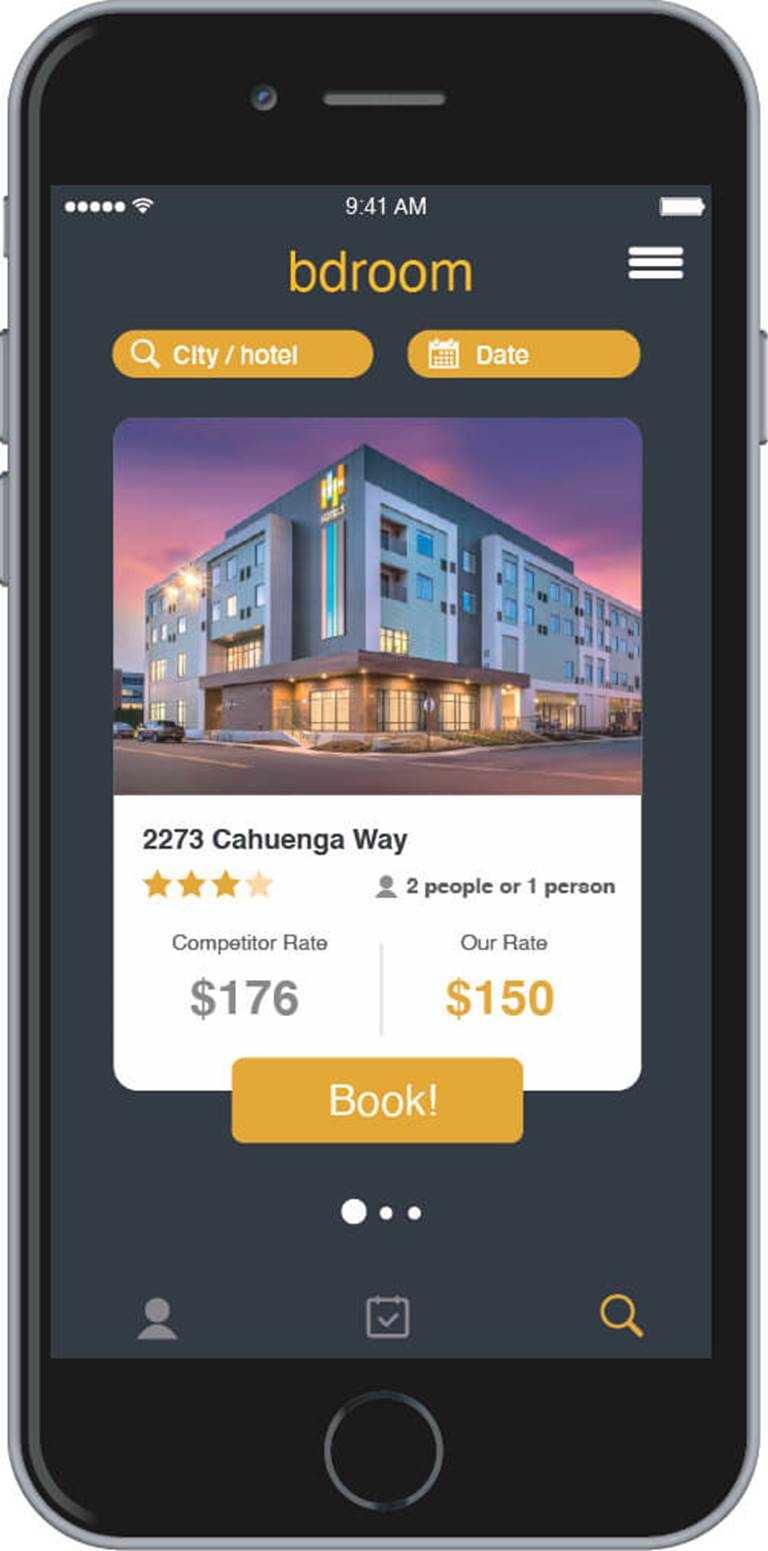
Final set of wireframes
After testing the refined set of wireframes and getting more input to help you continue improving your prototype, you can now design more polished screens. Again, we recommend that you engage a professional graphic or user experience designer. At this point the screens may be clickable, so you can test your wireframes on the device that you want people to use.


Communication Materials
If your goal is to drive awareness around a cause or program, or if you want to promote certain behaviors in the community, then you may benefit from prototyping the communication materials that you will use to achieve that goal. These can take the form of posters, digital mailers, social media posts, or other forms of visual communications.
-
First set of communication materials
Select images, key messages and/or modes of delivery (e.g. video, social media post, posters) that you think may be effective in helping you get your message across to your intended audience. Test these with people in the community, to see which images and messages resonate, what to leave out, and what may be the right combination of channels to get that message across.
-
Refined set of communication materials
Combine images and messages into actual artifacts such as a poster, brochure, short video trailer, or social media posts that look almost ready to publish. Test these with people to ensure their effectiveness and make sure you’re not missing anything.
-
Final set of communication materials
Try some of your communication materials in one school or in one outreach campaign, see how people react to it, and ask follow up questions to find out what can be improved before you publish these materials at scale.


Service Journey
You can use service journeys to think through and illustrate how different people across departments, agencies, or organizations work behind the scenes to coordinate their efforts in order to deliver a full solution. This includes people, technologies, and processes that have to be seamlessly integrated to deliver a positive experience for the community.
First service journey
A storyboard that captures all the key interactions with a solution is a great starting point for a service journey. So, if you created a Concept Poster that included a storyboard earlier in this module, then congratulations: you already have your first prototype! Use this storyboard to engage people who will be responsible for delivering the proposed solution. Ask them what types of processes, technology integration, rules and policies may be required to bring the proposed solution to life.
Refined service journey
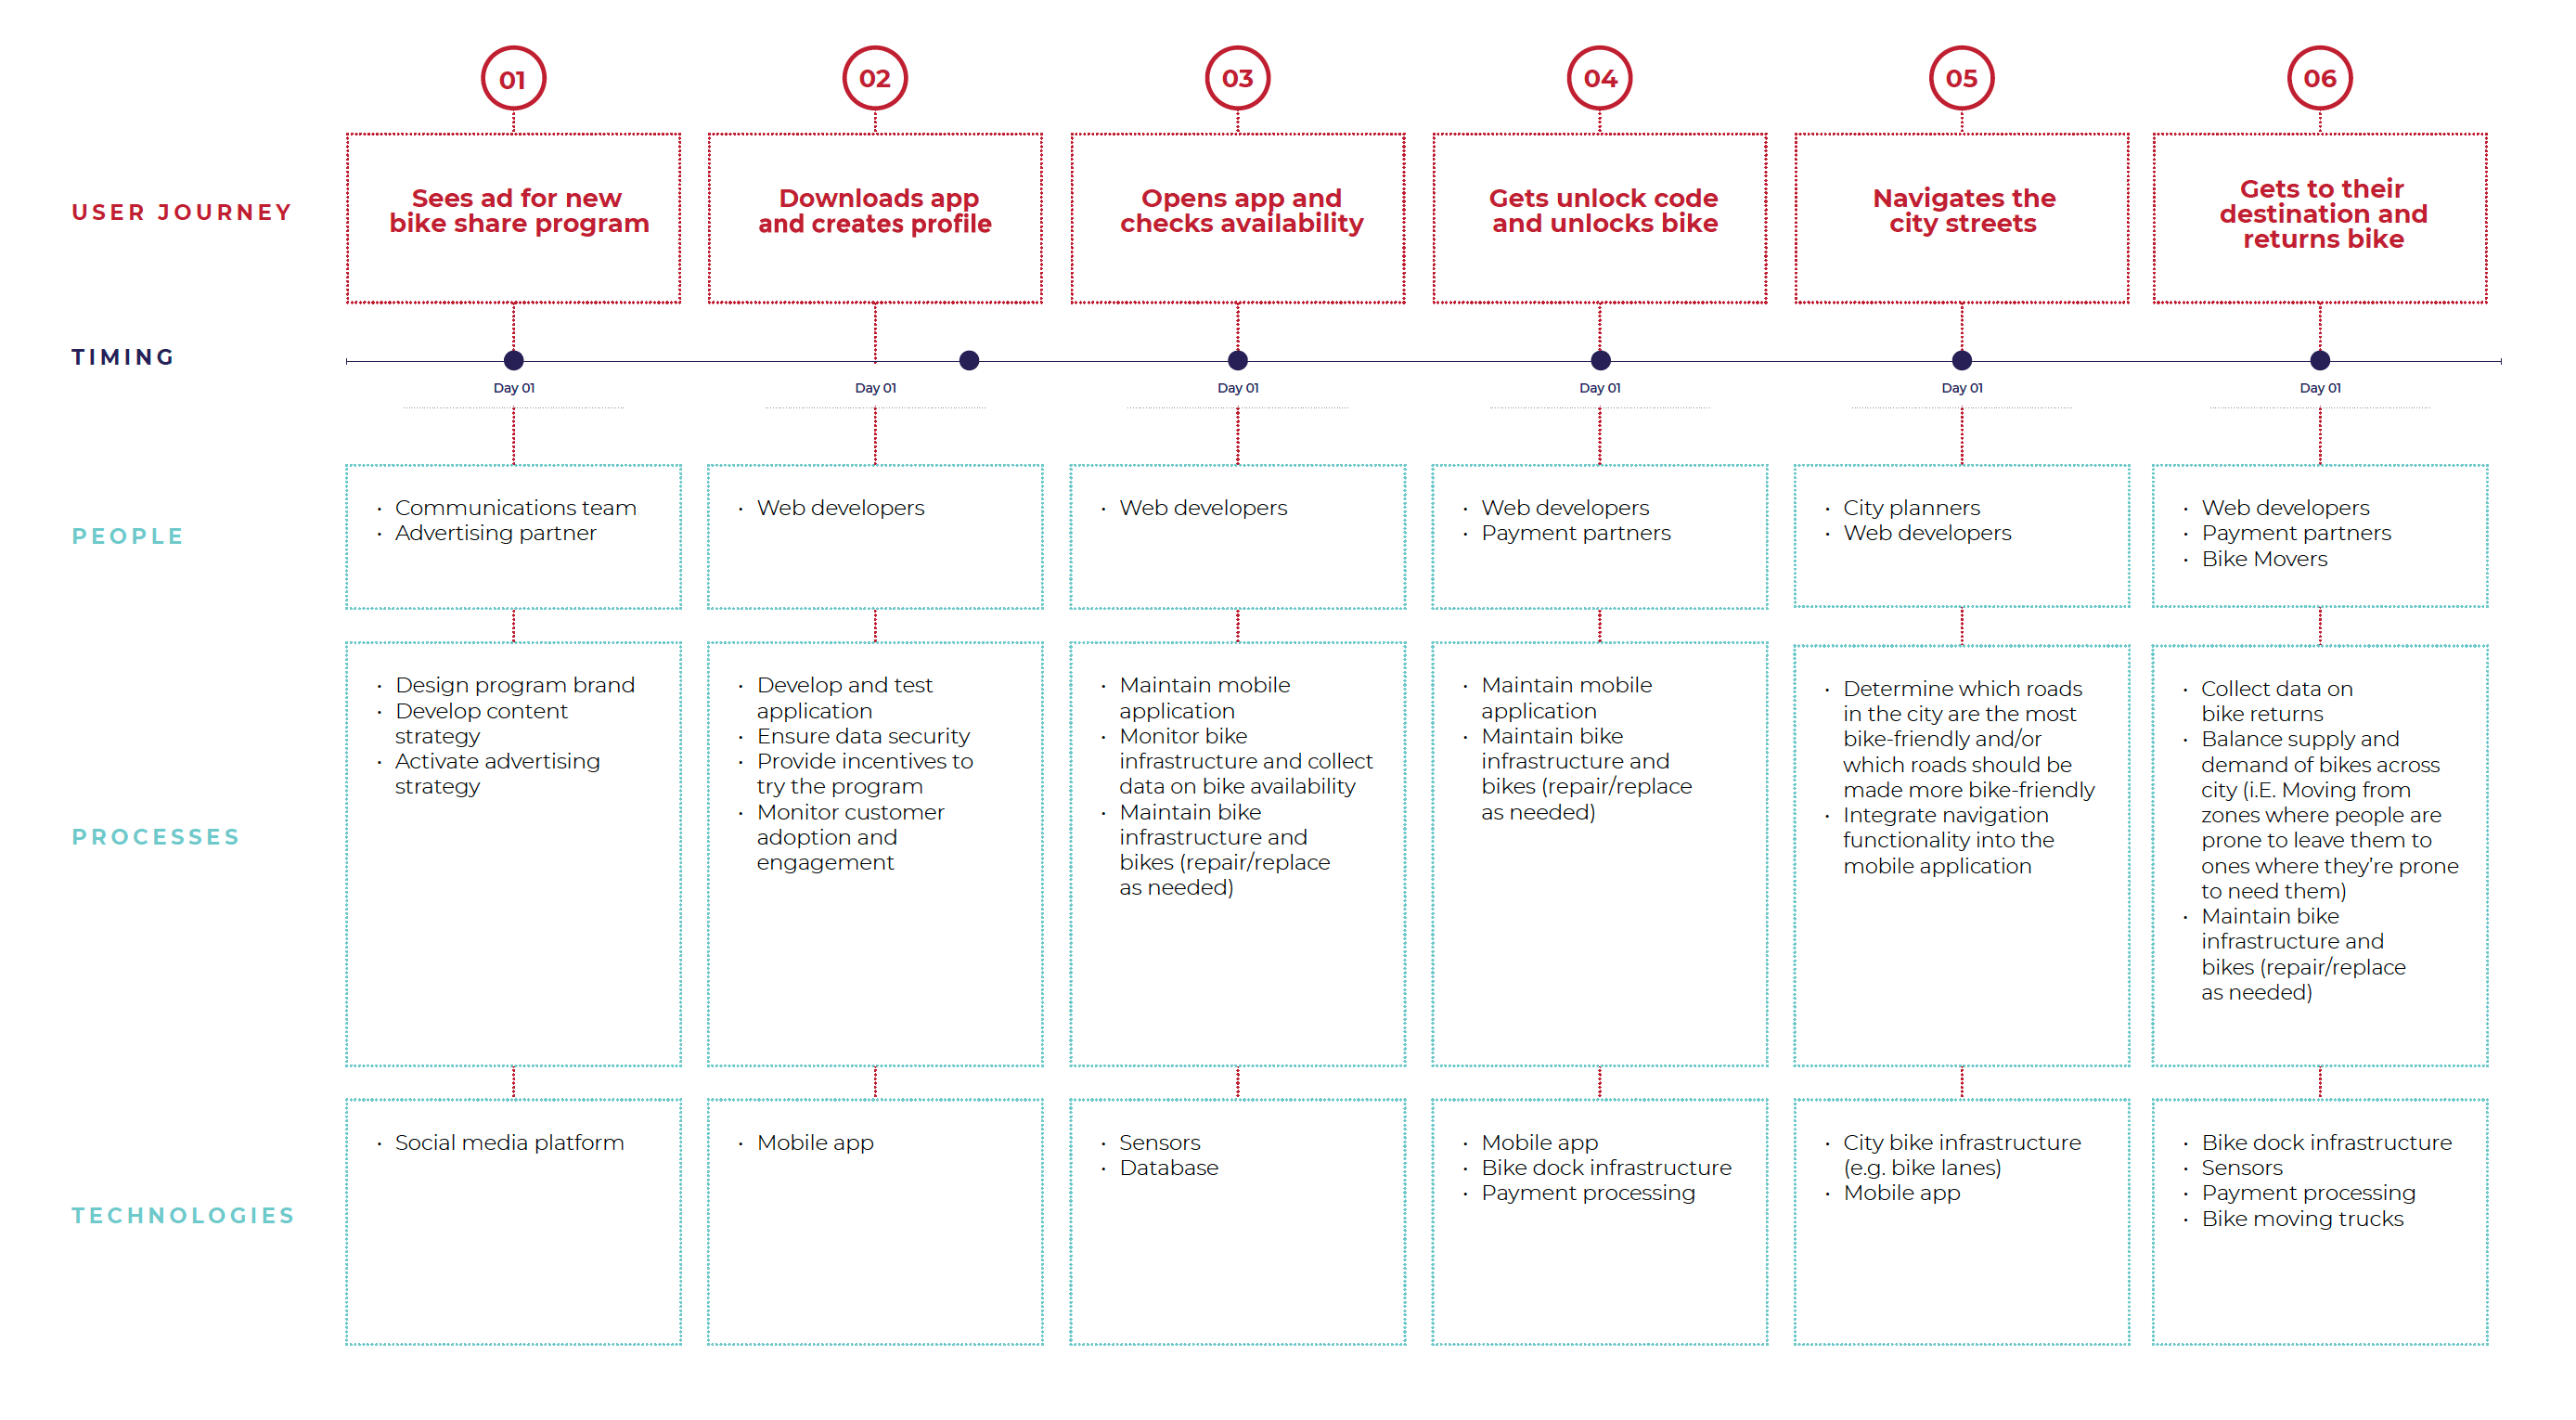
You have engaged people and received input on what needs to be integrated across people, processes and technologies. Now, create a version of the storyboard that allows you to show these integration points. Now, in addition to a brief description of the person’s experience, each drawing in your storyboard will include information about what will be required to execute that specific part of the experience. This version should also include any steps or interactions that you may have skipped or overlooked in your first version. At this point you may need to enlist the help of an experience designer or service designer to create your refined service journey. Consider reaching out to volunteers with this type of experience in your community, local design schools such as the IIT Institute of Design, Columbia College Chicago and University of Illinois Chicago, and/or professional associations, such as the Chicago chapter of the Service Design Network.
Final service journey
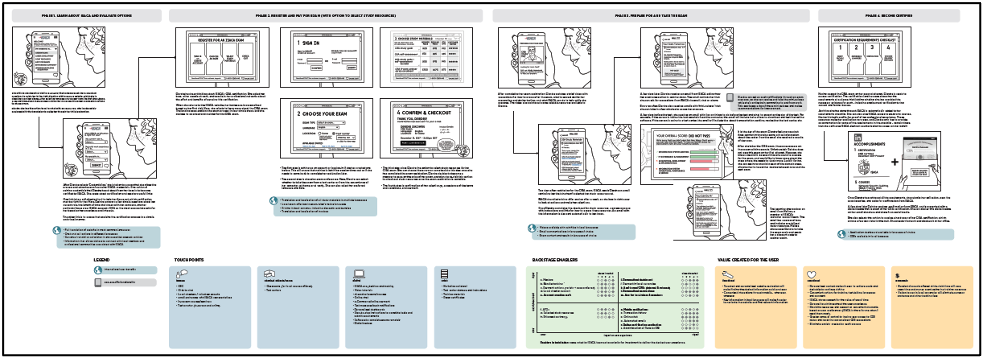
Once you test your refined service journey again with those that will be involved in executing the proposed solution, you should be ready to produce a final version. This may include touch points such as social media posts, signage at schools, physical spaces, a mobile app, in-person events, etc. The final service journey should have a comprehensive inventory of all the parts needed to deliver each element of the experience; the key integration points across different people, processes, and technologies involved in its execution; and great illustrations of all the key activities you envision the person doing. Think about it as a blueprint for a house, with all the information needed to build it to the exact specifications you want.
Prototypes May Help You:
- Reduce the risk of spending too many resources on an inadequate solution by starting small and simple, then refining your prototypes as you test them.
- Think about how your solution will work in the real world, what it will look like, and how people will actually interact with it.
- Receive actionable feedback by giving people something they can see, touch, and feel rather than just hearing you explain it.
- Make something to test your own understanding of what the community needs and whether the proposed solution will be well received.
Risk of Not Doing This:
- You may invest in a solution that you think will work in the world, and then find out that you missed the mark after it has been implemented.
- You may miss the opportunity to learn through doing. Planning and explaining will only take you so far.
- You may make a lot of wrong assumptions about how people will behave, how receptive they’ll be to your solution, and how it will integrate with their lives.
Recommended Inputs:
- Selected ideas from the Ideating module.
- Completed Empathy Maps and Insights from Sense Making and Problem Statements from Framing to determine the criteria you’ll use to evaluate ideas.
What Comes Next?
- Test your prototype’s key assumption(s) using the Testing module.
- Take feedback and generate new ideas using the Ideating module.
- Once you have built and tested a final version of your prototype(s), you can begin implementing your solutions using the Delivering module.
Do's
- Keep your prototypes simple. Your goal is not to create the first version of your final solution from the get-go. Create the fastest, simplest, and cheapest representation that will help you learn and clear a key assumption first. Then, refine your prototype as you test.
- Share your prototypes with other people before heading into formal testing with community members; this gives you a chance to practice and tweak as needed.
- Use readily-available and inexpensive materials. When building early prototypes, consider using materials that you have easy access to like cardboard, paper, boxes, markers, glue, popsicle sticks, fabric, etc. The goal of an initial prototype is not to create a high-fidelity representation of your proposed solution, but something with enough fidelity to allow you to communicate how a specific part of your solution would work. As you iterate your prototype through testing, you should improve its fidelity and begin testing how some of its key features will work.
- Engage students or volunteers with a background in art of design to help bring your prototype to life. While your ideas and concepts can be loosely sketched to communicate your solution initially, taking your concept out to the public requires more refined illustrations that clearly communicate specific aspects and features of your solution.
Don'ts
- Do not get fixated to one type of prototype too early. Identify the assumptions you want to test first, and think about who you want to engage and what you want to learn before you choose what prototype to build. Search different prototype examples online for inspiration.
- Do not build a prototype of the entire solution right away. Focus on the key features and assumptions you identified. Which areas do you want to learn more about? Which parts of the experience are most critical to the success of your overall concept? Prioritize building and testing those.
- Do not create high resolution representations of your concepts for early prototypes. As tempting as it may be, a prototype with a finished look will often lead your people to comment on the look and feel of the solution rather than on the overall validity of the concept and its key features.
- Do not get too hung up on the details. Focus on building the aspects of your prototype that are critical to communicating the essence of your key assumptions first.
Documentation Tips
- Be sure to take photos of all templates and any additional outputs during your prototype planning. Ensure that the content in each section is visible and readable in the photos.
- Take photos of your prototype building process. Keep detailed notes of comments and feedback you receive when sharing your prototypes internally. You may even want to record your conversations so that you have a record of any feedback provided.